Sunday, June 22, 2008

I know that you wouldn’t know, but I made tons of bento boxes throughout the school year. You wouldn’t know because I hardly showed you any….so I figured this would be like “spring cleaning” of my bento inventory…

…but then I realized I have no bento inventory. So I decided to just show you all the fun projects I’ve done over the school year (the ones that I remembered to take pictures of). This post will serve and a short post for some foods and as a teaser for others that need a seperate post of their own.

Here we go! (Starting with my cleaning of the back of my photobucket account, followed by actual length posts)


Photobucket


Photobucket


Photobucket


Photobucket Explorations of Matcha!

Photobucket Journey to Korea...in my stomach.

Photobucket Natto....natto.


Photobucket SPAM!

Sunday, June 15, 2008

Update

Sorry for taking so long! Once again I apologise when I'm not actually going to write anything more then a list of what to look forward to;

  • Potstickers
  • Greentea
  • Multi part Korean food series! Whoot!

Wednesday, May 21, 2008

Summer Rolls

Vietnamese summer or salad rolls are a true culinary wonder, fresh vegetables and meats and/or seafood wrapped up in a delicious rice/tapioca blanket…mmmm. Most people know what spring rolls are…at least those who have had deep fried Chinese food, as for summer rolls; they are less common and much, much more mysterious….

“Spring rolls are pastries mostly with julienne vegetables (such as cabbages, carrots, or wood ear fungi). Some include strips of meat, usually beef or chicken; others have seafood in them. The filling is wrapped in a thin, flour wrapper, and usually deep fried. Pork is typically used for Vietnamese fried spring rolls.” -According to the official spring roll fan listing at http://misty-morning.net/springrolls/about.php (which got its definition from a Wikipedia article).

Summer rolls aren’t deep fried but the fillings are similar. The wrapper is not flour based for frying but usually make of rice or tapioca.


According to Wikipedia summer rolls are called goi cuonin in Vietnamese. This translation is mistaken to mean spring roll, it really means “mix salad rolled”. But spring roll stuck, and the term summer roll was probably coined to differentiate between the dish and its deep fried cousin.

For ages I wondered what the delightful translucent wrapper was that help the summer rolls together. When I asked the sushi chef (itamae) from my grocery store what the strange wrapper was, he said “rice vermicelli”, which I instantly pictured as noodles not anything close to what I needed. And of course the store didn’t carry anything remotely like that so I was stumped. When I was browsing the Steamy Kitchen Blog, ( http://steamykitchen.com/blog/ ) I saw a video on how to make summer rolls! I had finally found what I was looking for. I stopped by the Asian food store and visited an area I had passed many times before. I took my time picking out some wrappers and got to work..

There isn’t a super definite recipe for summer rolls as you can put anyting in them. I have eaten summer rolls on multiple occasions; I have made them with meatballs, and eaten them with vigor at home, at grocery stores, and at restaurants. When making a summer roll, what you come to expect for the finished product depends on the freshness of the ingredients and how traditional your recipe is.

At my local grocery store they have a sushi section which also hosts a variety of summer rolls, my favorite of which is the spicy chicken roll with sweet chili sauce. A little farther down the road is my local Asian market, which hosts more traditional rolls; lettuce and herbs with rice noodles, pork, and shrimp, all in one roll, with peanut dipping sauce.


A basic recipe I like is one found on Chow ( http://www.chow.com/recipes/10641 )


Vietnamese-Style Summer Rolls with Peanut Sauce

By Regan Burns
Give yourself plenty of time (and counter space) to make these. And be sure to have a few extra rice paper wrappers on hand—it may take a few tries before you’re rolling like a pro.
What to buy: Look for medium-size shrimp. For a slacker solution, buy a ready-to-eat shrimp cocktail ring from the supermarket and slice the shrimp in half lengthwise. Rice sticks and rice paper wrappers can be found in most Asian grocery stores. For the wrappers, we like Red Rose brand.
Game plan: Be sure to have all your ingredients ready and easily accessible when you start to roll. Store the summer rolls in a dish or plastic container that’s roomy enough to hold them without their touching. Place a damp paper towel in the bottom of the container to keep the rolls moist. Cover tightly with plastic wrap.
INGREDIENTS
12 medium shrimp in their shells
2 ounces dried rice sticks or rice vermicelli
8 (8-1/4-inch) round rice paper wrappers
1/2 cup mung bean sprouts, rinsed
24 small mint leaves (from 1 small bunch)
16 basil or Thai basil leaves
8 small sprigs cilantro
1 Thai hot pepper, serrano pepper, or other small hot chile pepper, seeds removed and sliced into very thin matchsticks
1 small cucumber, peeled, seeded, and cut into 1/4-by-1/4-by-2-inch sticks
2 large scallions, trimmed, halved, and sliced into 3-inch lengths
4 Boston lettuce leaves, cut in half
Peanut Sauce
INSTRUCTIONS
Bring a medium saucepan of water to a boil over high heat. Add shrimp and cook for about 1 1/2 minutes, or until they are bright orange and just cooked. Drain shrimp in a colander and run cold water over them until they are cool. Peel shrimp and halve them lengthwise down the center. Cover and refrigerate.
Cook the rice sticks according to package directions. Drain and set aside.
Clear a work surface, such as a large wooden cutting board, for rolling the summer rolls and prepare a pan that is roomy enough to hold the finished rolls in a single layer. Place all filling ingredients in separate containers, and arrange them in the following order around the board: rice paper wrappers, shrimp, rice noodles, bean sprouts, mint, basil, cilantro, hot pepper, cucumber, scallions, and lettuce.
Fill a wide, shallow dish, large enough to hold the rice paper wrappers, with hot water. Evenly submerge one rice paper in the water for about 30 seconds, or until it is soft and pliable. Remove from the water and place on the work surface.
Working quickly, lay three shrimp halves in a row, cut side up, just above the center of the wrapper. Layer a scant 1/4 cup of noodles over the shrimp, followed by a few bean sprouts, 3 mint leaves, 2 basil leaves, 1 sprig of cilantro, and 2 pieces of the hot pepper (if using). Place 3 to 4 cucumber sticks and 3 to 4 scallion pieces on either side of the noodle pile. Roll one piece of lettuce into a cigar shape, and place it on top of the noodle pile.
Fold the bottom half of the rice paper wrapper over the filling. Holding it firmly in place, fold the sides of the wrapper in. Then, pressing firmly down to hold the folds in place, roll the entire pile up to close the top. (Don’t despair, this takes some practice!)
Turn each roll so that the rice paper seam faces downward and the row of shrimp faces up. Place in the prepared container.
Serve summer rolls with Peanut Sauce.

Monday, May 19, 2008

WOW!

WOW! I'm actually posting! Something! Just kidding this post will be of substantional value. Okay not this one...this is for your/my reference of up coming posts...but the second I'm done with this I will post a real...post.

By the way, my apologies for an almost 2 month hiatus...at least I'm on top of my other blog! I figured it was time to get started on this one.

Up and Coming:

  • Bento and my new cook book (also to be posted in sister blog)
  • Poststickers/Jiaozi/dumplings/wontons GALORE! and the art of freezing food!

Monday, March 10, 2008

Spicy!

Get ready for...
a Culinary Adventure!
This will be my first of what should already be my fifth post on Indian cuisine. I have been an Indian food maniac forever and just now got to cooking some real Indian food. But since its been so long now lets take a trip back in time….


I took a car ride down to the good ol’ bookstore at the mall at least a month ago and got to flipping through plenty of cookbooks. Of course went through the usual; Japanese cuisine, food journals (whatever is not a “pure” cookbook but also maybe a book about food and travel), and whatever else caught my eye. But browsing through the books I always spot the Indian and Moroccan cookbooks next to the Japanese ones, and then I reminisce on the good times and good food at the local Indian restaurants.

Weeks pass…I want to visit the local Indian market but am much too busy. Weeks pass…

Finally make it down tot the Indian market and purchase pomegranate molasses, rose water, dried chick peas, and paneer cheese.

The delicious paneer goes quick after I borrow a great cook book from the library India's VegetarianCooking by Monisha Bharadwaj and I mess around with different recipes.


After plenty of experimenting I have even furthered my interest in Indian cooking. I will continue to explore and post on my findings!

I figure it would be pointless to provide ALL the recipes as I am lazy but these are the pictures and the recipes names from top to bottom
  1. Slow Cooked Mushrooms; Dum Ki Khumb, (I left out the yogurt), my favorite of the bunch cause I love mushrooms and I LOVE the spices used.
  2. Indian cheese with peppers, onions, and tomatos; Paneer Jalfrezi, (nummy! Though I woulden't try grating the onion I would lightly carmelise them insted...I love onions )
  3. Spinich with Cheese; Palak (or saag) Paneer, not the best looking but a great source of iron with the tomatos, and mighty tasty too!
  4. This is from a box, though I don't remember the name, it was really spicy and great with couscous!

Sunday, February 24, 2008

Catering

I am ALL over the catering business right now. Tomorrow I will be "shadowing" a Seattle catering company called…for school. Its called shadow day, but in essence it’s virtually career day. I am SO glad I got this opportunity to do this God has pulled through again! I was about to be stuck with shadowing my mother (accountant for Bank of America) when my dad pulled the stops and got this connection through one of his friends.

What’s funny is that not only do I need a caterer for my schools prom (called JSB for Junior/Senior Banquet) but I just went to my first wedding yesterday (and caught the bouquet!) and got a taste of some fancy catering. I am in charge of organizing the prom as president of my class and therefore head of prom committee. I’m not really president…we are more of a…I don’t know, but I’m defiantly not head. But the Presidential status does look better on an application then the position I was going for (secretary, I think).

Once I do some reasearch and am through with the big day I'll tell you all about it.

Saturday, February 23, 2008

More dairy induced goodness


I’m back on the Ice cream train, just getting over the mountain that is the mastery of the art. Its hard work to make good ice cream. It’s no stir fry. I recently tried a list of things including pudding, jell-o, and yogurt. All can bring great results if done well.

Most of the time gelatin and pudding play second string…and I don’t mind one bit. Gelatin is much better suited to play a texture enhancer, plain and unflavored, in ice cream or frozen yogurt (my case), then to play full flavor lead (lime was my case, possibly the most artificial jell-o flavor ever, and doubly artificial in ice cream). Pudding is the same. Most popular use is plain vanilla or pistachio pudding when used in ice cream. I also did a lot of frozen yogurt. I think frozen yogurt might be ever harder than milk/cream based ice creams. This is due to the fact that without sugar or other forms of sweetening, the plain yogurt is very tart. This wasn’t great when I tried to make mocha frozen yogurt, but great with sour cherry. Mmmm…cherry.

I am currently intrigued by a vegan ice cream blogspot and “stole” (my slang for take, most always legally) some recipes. One for vanilla (as a base for a lavender ice cream) and one rum raisin. I am very exited about getting to use my lavender which I will of course use to make cookies, spices, and the like. I am planning to make lavender pancakes tomorrow (…well today, as its past 12 am)…I need sleep; I’ll tell you how the ice cream turns out!

Friday, February 22, 2008

The most gorgeous pan in all my days...


maries ops 638
Originally uploaded by javakat343
Finally went to Daiso for another trip. This time I had a few kitchen aids in mind. First off I wanted a tamagoyaki pan, (checked off my list at the regular dollar fifty price) next I needed a cooking grill for making yaki onigiri (also $1.50) and finally the tamagoyaki pan…

No go. They sell out like, like, like…oh I don’t know, the sell out like anything on sale on the day before Christmas. They are never there. They are SO not in stock that I doubt the store ever had them in the first place…Anger.

So after much online searching I decided that 20 dollars was a suitable price…even though if I had waited a week I could have got one for 9 dollars on Amazon…but I am not that patient. Besides! I have wanted a takoyaki/abelskever pan FOR-EV-ER! I waited for an opportune moment but I could never get the 3 (under line the 3 five times won’t you?) dollar pan at Daiso. Okay! Do We Understand the Frustration? I payed 20 instead of 3!!! WTF!

But this really is the wrong attitude. I mean I have the freaking pan now. I should be, like, grateful. I’m so grateful I have already said the word “like” 5 times already. Bad form, bad form…ah well.

I am already scheming ways to use this pan. I have already made spherical crab cakes (yummy!) and will make cherry jam filled pancakes and lavender sugar pancakes tomorrow morning.

Sunday, February 17, 2008

Lavender is Purple!


maries ops 473
Originally uploaded by javakat343
So I try (but fail) to keep my goal of keeping my blogs equal in posts, but recently I have been falling behind. Right know the toll is 33 to 22 so as you can see it has been easier for me to keep track of food rather than anime. Can you blame me? NO! I have very little time to watch anime and while food is necessity anime really just…*gulp*…isn’t. But I have like a BAZILLION things to talk about, SO! I have plenty of fun reading coming your way.

FOOD
• Library books! = Cooking fun!
• Facing my fears: all you can eat sushi and seafood buffet
• Lavender the color of…Purple?
• Annatto, Now you know.
• New Diet,Low Iron! So much for giving blood!
• Grow your Own Dinner
Both
• Daiso raid

SUTEKI DA NE???

But another problem is when I’m so behind on posting I tend to blend all my posts together for example I can’t seem to just discuss one item in my blogs I commonly have to refer them for later.

But lets talk about something else shall we? My hell week is finally over so Friday I found myself with the desire for a mini shopping spree. I headed done to the mall to check out the site as “they” have been doing a lot of revamping to the Northgate mall. They already added plenty of new restaurants BUT they have an especially interesting one that I will gladly review for you later: All you can eat sushi and seafood buffet!! It’s pricy as all buffets are but SUSHI?? How insane is that? It’s called Bluefin. You can read about it at http://bluefinseattle.com/ . But I’ll give you a review later (I told you!) . For now I have to tell you all about what I bought (Oh joy). I have been desperately searching for a takoyaki pan to buy without having to pay 30 dollars for a “Puffy Pancake Pan” at the Seen On TV store. The cheapest was Target at 20 dollars but I was assured that Daiso had a 6 dollar one that goes quickly and that’s why I never saw it…I did pick up this “Patty Trio” which is good for making speedy empanadas, ravioli, wontons, or wannabe UncrustablesTM. It’s defiantly not a unitasker! But all this stuff (takoyaki, sushi reviews, and wontons) is another post (Got you again!).

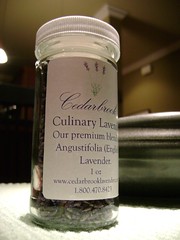
FOR NOW, I have major ultra colossal news. Before I left the mall I FINALLY picked up a bottle of culinary lavender from a mall stand there. It was ridiculously expensive (at 7 dollars for a 1oz bottle, the bottle it self costs like 3 dollars) but sooo worth it. I have been dying to experiment with lavender lately and haven’t had the time.

My ideas for future lavender based culinary exploration are;

• Lavender lemon spice seasoning
• Lavender cookies with Lavender sugar
• Chicken with Herbs de province
• Lavender lemonade
• Lavender jelly (I’ll have to do a post on herb jelly later..dangnabbit!)

Wednesday, February 6, 2008

Religious chocolate, caramel, and nuts.


maries ops 400
Originally uploaded by javakat343
Religious nuts...Nuts! Get it?! Well I promise you I'm not nuts and I'm a free Methodist! Anyway today is "the beginning of the Lenten season" and I participated in the traditional Ash Wednesday service. I sang in choir (though do to my lack of car missed practice and lost my solo *cry*)and got a big grey cross painted on my forehead. This was actually my first Ash Wednesday as I didn't even know my church participated in Lent. Well now I do…and I will participate in some form of fasting. But this blog is about food not my religion. Well… in this case it’s both. You see my brother and my dad stopped by the Christian book store to get a new Bible and my dad picked up these candies. Suprisingly they taste quite good the chocolate isn't low grade and the cute scripture on each wrapper is really fun.

Saturday, February 2, 2008

Fluffy Fluffy Bread: Journey to Great Ma-pan part 1

Completed!!

Remember back when, when I told you I broke my rice cooker trying to make bread? Well my broken rice cooker has been replaced by a much nicer one…so maybe if I can learn from my mistakes, I can try the bread again…And I did! Now the purpose of being able to make bread in a rice cooker would usually only apply to those without an oven or bread maker, but I have both. Aside from that I just plain did do it out of love for bread and for the show Yakitate Japan!!!, which translates from Japanese to “freshly baked Japan!!!” This is a pun as the show is about making bread worthy of being called Japans national bread and “pan” means bread so Japan=ja-pan=Japanese bread. Any how this recipe is nothing new. My first attempt was before there were English translations of the recipe (in English measurements not cc and grams) and there were guides on both instructables and wikihow. I used wikihow because the measurements were clearer and it was all on one page.

• 188 grams flour (1.5 cups)
• 5 grams yeast (about 1.25 teaspoon) dissolved in…
• …180 ml water (6 oz.) (and a pinch of sugar)
• 21 grams sugar (about 1.5 tbsp)
• 6.5 grams salt (about 1.5 tsp)
• 21 grams butter (about 1.5 tbsp)
• 30ml milk (1 oz.)

Proof the yeast in the warm (80-100 degrees F) water for 10 minutes.
Aerate the flour in the rice cooker bowl and mix with sugar and salt.
Once yeast is foamy add it and milk to the dry mixture and knead.
Make sure you have floured hands or else its going to me messy.
Once you have formed the dough incorporate the butter and let the dough rise for an hour.
Toss the dough around in the bowl or drop from 5 feet (do not pound ) to get the gas out gently.
Let rise a second time.
Bake about 30 minutes on each side in the rice cooker (checking regularly so that it doesn’t burn.
Depending on you rice cooker the first bake could be 30-60 minutes but the next to bakes should only take an 30 hour.


http://www.wikihow.com/Make-Rice-Cooker-Bread


The bread came out cute and small

In the end my bread only took an hour to cook; 30 minutes on each side, presing the cook switch 3 times for each side. It was done perfectly and had nice texture but the taste was so-so. If I wanted really great flavor without adding spices and such, I would have to had used a starter or vinigar/beer in the bread to give extra depth. As this bread had only used instant yeast it was nothing I could enjoyably live off of with out butter or soup to dip it in. As for the cooking method, there was nothing to complain about it. Just know your rice cooker. In other words, once you have made this once and understand how the bread cooks in your rice cooker it should be a breeze to make a second time.
Next time I might spice this bread up with whatever:
  • Cottage cheese/dill
  • Beer
  • Nuts
  • Fruit: cranberry, blueberry, raisen
  • Cheese
  • Garlic


Friday, February 1, 2008

I'm addicted to the 50's


I'm addicted to the 50's, there is not other way to put it. I love hairspray, (mostly the movie), white shoes, bright dresses (picture above), casseroles, and everything about it (except segregation and drive in movies).

So today I was reading (blogs of course) and was once agagin reminded of my limited knowledge. I was hungry for power (as they say knowledge is power) and so I headed to the library. I grabed about 5 books, skimmed through them, grabbe another five and continued to read.

I went through alot of sushi books and some that caught my eye but I decided if I was going to actually buy anything then these books were going to have to be inexpensive, and attractive.


I am a firm believer that pictures sell. I mean unless its about food and travel, or a book about food but not actually a cook book, like The Man Who Ate Everything, or The Nasty Bits (both which I have yet to finish), then it must have pictures! If presentation if so crutial to a meal then why, WHY, do some cook books have little or no pictures??? How boring would my blog be without pictures? (only a little :) ) Most of the time I can put the recipe together in my head after reading it, but I am convinced a lot easier and quicker, if the book has pictures.


SO where am I going with this? If you combine my love of the 50's and my requirement of an abundance of pictures (plus a reasonable price), then you get my two new books!


Deceptivly Delicious is a book about finding sneaky ways to feed your kids healthy foods for example sneaking pured califlower into mashed potatos. It is written by Jessica Seinfeld (who was featured in the Rachel Ray magazine, October 2007) the wife of comedian Jerry Seinfeld and mother of 3 kids. Her book features clever recipes that are not only tasty but full of nutrition and accompanyed by her peanut gallery of her husband kids, and nutrition guru, Joy Bauer. The design of the book also screams 50's, which in case you forgot, I love!


My nearly nameless casserole and one-pot dish book is 50's to the core. It features plenty of easy delicious recipes.

Sunday, January 27, 2008

Weekend Cookfest

I finally got a chance to do some cooking aside from my busy schedule. I'm very pleased that I got the chance. Both of these recipes are quick, easy, and filling!

Pasta with Walnut Sauce Original recipe by Nigella Lawson

I used Nigellas recipe but used 8 oz walnuts (and forgot you only add 5 of the 6 oz in the origional recipe anyway) and so ended up having to change the recipe accordingly...no matter what you are definitely going to have more milk, butter, oil, whatever as this sauce will more likely than not come out thick.

  • 8 oz walnuts (save some for garnish..if you want)
  • 1 slice bread crusts removed
  • 1 tsp garlic paste (or minced garlic)
  • 1 cup milk
  • 1/3 cup Parmesan cheese
  • 4 TBS olive oil
  • salt and pepper to taste (don't skimp on the pepper)
  • pasta (flat and short is best, I used what I had)
  • parsley

Toast walnuts in a dry skillet. Mix first five ingredients together and slowly drizzle in olive oil. Add spices as desired (I would go heavy on pepper and not skimp on the salt as the sauce will be too bland other wise). Cook pasta according to directions and eat with sauce and parsley and Parmesan if desired.

For a more accurate recipe (and smaller serving):
http://www.foodnetwork.com/food/recipes/recipe/0,,FOOD_9936_35389,00.html

I made enchiladas as well and those were great. I, being the unpredictable person I am decided to go for green sauce instead of the regular red. I followed the recipe on the back of the sauce can (oh how taboo! What do you expect? I said quick and easy not from scratch!) Enchiladas have many different construction methods and I'm not here to debate on correct enchilada etiquette but I went about it as such.


  • Fry tortillas in minimal amount of oil (not deep fry but pan fry).
  • Continue this proccess as chicken in cooking in oven.
  • Once i'm done with the tortillas fry up the now shreaded or cut up chicken in a "pat" of butter.
  • Put a little bit of chicken in each tortilla and roll up.
  • Place your free form "burritos" in baking dish and cover with enchilada sauce.
  • Sprinkle cheese (I used pepper jack) on top and bake in oven (350) for 10 minutes or until cheese is melted and sauce is warm.


Thursday, January 24, 2008

Junior Hell

I haven't had a real meal in weeks. Tis the life of a junior. My creative juices are overflowing and I don't have time to mop up the mess. It hurts to not cook, it really does, do you know how much the lavender stand in the mall, and the indian market down the street have been calling me? Why am I even writing this? Got to go write a 3 papge paper on salt...and ice.

Thursday, January 17, 2008

Orange Chocolate, a delicious combination

So I tried my hand at "curd cake" again and this time was satisfied with the results. I found my excuse to try again when my friend’s birthday arrived and I felt obligated to make her some form of cake. I love the chocolate orange combination and this cake is so light and airy from the whipped egg whites. It’s wonderful!


Chocolate Orange Curd Cake (Based of Alton browns orange curd recipe and from Emily Luchetti's recipe from her Four-Star Desserts cookbook)

Ingredients
· Orange curd (below)
· 2 cups chocolate cake mix (German chocolate is my preference)
· 6 egg whites

Orange Curd by Alton Brown

5 egg yolks
1 cup sugar
1/3 cup orange juice from 1 fresh squeezed orange (add water or additional OJ if short of a 1/3 cup)
1 Tablespoon orange zest, from the orange, do not forget this!
1 stick butter

whisk eggs and sugar together for at least 4 minutes, combine juice and zest and then whisk in to egg/sugar mixture, over a double boiler whisk the mixture for 8-12 minutes, when thickened remove from heat and add butter a tablespoon at a time, and finally chill for 4 hours before serving. This keeps for 2 weeks in the fridge.

Cake!
Preheat oven to 325F. Butter and flour a 9-inch round x 3-inch high cake pan.Mix curd with 2 cups Betty Crocker (or other brand) German Chocolate cake mix.
Using the whisk attachment, in the bowl of a stand mixer beat the 6 egg whites on medium speed until frothy. Increase speed to high and gradually add the 1 1/2 cup sugar. Whip until soft peaks form. Gently fold the whipped egg whites into batter. Spread batter into you prepared cake pan. Tap pan to remove bubbles from batter. Let sit five minutes and tap again. Bake at 325F until cake tester comes out clean, about 45-55 minutes. Cool on rack and then remove cake from pan.Dust with 1 tablespoon powdered sugar or frosting if desired.


If you think that using store bought/pre made cake mix is taboo then check out this other recipe! http://steamykitchen.com/blog/2007/08/05/negative-calorie-chocolate-cake/

Sunday, January 13, 2008

Oh Bento!

Photobucket

I have been completely overwhelmed by my abundance and busy schedule. I should be GRATEFUL that while so busy, do to upcoming semester exams for junior year, I don't have to worry about food. But no, I get MAD at my parents because I am trying to get some cooking in and they are bringing home Thai and Mexican takeout. What can I say "I don't want the sukiyaki beef to go bad!" too late...I have some bentos that I have been lazy and haven't told you about yet. For relatively good reason, first off, If I don't like the food I cook then you definitely aren't going to like it.

That's why I'm initiating a rating system where I will "grade my performance". From now on My creations' will get a score out of 5 stars...or ice cream cones (whatever I feel like). Almost a disclaimer, but not. The recipes will be revised though so they should be better then the original rating/recipe. I should also probably start pre-writing my posts on Microsoft Word first, as it automatically corrects all the misspelled words (I have to use spell check every other sentence).


Back to the bento. This was my favorite bento of recent as it was deliciously India inspired. What you are seeing is rice covered by two wonderfully spicy coconut and mango chutneys. I give this recipe Five Stars! Whoot!


Mango and Coconut Chutney Bento
By Me! Inspired by.... other recipes. Alton browns chutney + thai mango salsa recipe=My recipe!


Ingredients; For mango chutney
1/2 diced red onion
2 tablespoons of Sriracha chili sauce
2 Mangos cubed 1/2"
teaspoon ginger (I use paste)
1 oz cider vinigar
1/2-3/4 cup cubed pinnaple
Optional: garlic
salt to taste


Saute the red onions in a tablespoon canola oil and a teaspoon of salt until soft and fragrant, mix the rest of the ingredients together and add cooked onion.


Coconut Chutney was a mix of like five obscure Internet recipes


1/4 tsp dried chili flake (more to taste if desired)
1/2-1 teaspoon curry powder
salt to taste
1/4 tsp mustard
1 tsp ginger (paste)
1 1/2 cup shredded coconut
Small can 14 oz/1 cup Beans or(use what you prefer..I used kidney because...well I wanted too, traditional Indian lentil's are also good choice)
1-1/2 cup frozen peas


Heat the oil and start cooking the spices, take off the heat add mustard and ginger and mix, immediately add the coconut and mix the "spiced"oil throughout. The coconut should turn yellow, from the curry poweder. Prep the beans/lentils and peas (cook and drain) and mix with the coconut.

Photobucket